What Veya is, and why we built it this way
Almost every "AI feature" you have used is a chat box bolted onto an app that was designed before AI existed. It can talk about your work. It cannot reach it.
Veya is built the other way round. It is a platform, built from the ground up, that runs natively on macOS, Windows and Linux, and treats AI as the substrate rather than a panel on the side. The model does not describe what you should do — it does it, in the document you are looking at.
The prompt does most of the work. You type or speak; Veya works out which surface you meant, finds the material, assembles it and produces the thing. "Summarise my unread mail." "Put this on Thursday." "Write the intro from the notes in this project." Searching, gathering and making are one action, not three apps and a clipboard.
Agents handle the work that outlives a single request — the multi-step jobs, the things that run on a schedule, the follow-ups you would otherwise have to remember. They show their working, and you can watch them run.
MCP is how it grows. Model Context Protocol servers plug in as new capabilities, so the tools you already use become things Veya can operate — without waiting for us to build an integration.
One workspace, many surfaces
- Docs — writing, with AI that edits in place rather than in a side panel.
- Sheet — spreadsheets you can ask questions of.
- Slides — decks generated from the material you already have.
- Mail — your real inbox, readable and answerable by the agent.
- Calendar — scheduling in the same sentence as the thing being scheduled.
- Photos — searchable by what is in the picture.
- Files — your documents, indexed and reachable by meaning.
- Notes — quick capture that the rest of the workspace can see.
- Projects — related surfaces sharing one context.
- Atlas — one navigator across everything you are working on.
- Agents — build, run and watch your automations.
- Apps — MCP-powered tools, added as you need them.
- Playground — a canvas where the AI builds the interface itself.
Not in the beta: a CAD canvas for 3D modelling and an embedded browser surface are both built but not switched on for this release. They are coming; they are not something you should download expecting to find.
The part that matters most, and the reason it is built the way it is: your content stays on your machine. Documents, mail bodies, photos and the search index are all local files on your own disk. Voice transcription runs on-device. What leaves your machine is the model call — and you choose which model that is, including running one locally.
We think this is what an operating system looks like next: not an app launcher with an assistant attached, but a deeply integrated platform where intent is the interface. This post gets you installed and connected. It does not try to teach the whole app — the app is designed to be asked, not learned.
Before you start
| Platform | What ships | Notes |
|---|---|---|
| macOS | Apple Silicon only (arm64) | M1 or later. There is no Intel build. |
| Windows | x64 installer (NSIS) | Windows 10/11. Installs per-user — no admin rights needed. |
Roughly 400 MB of disk for the app itself. Local models are extra and optional — a few hundred MB to several GB depending on what you install.
1. Install on macOS
Paste this into Terminal. It downloads, mounts, copies to Applications, unmounts, and launches:
curl -L -o ~/Downloads/Veya.dmg \
  https://dl.sozenta.ai/veya/edge/Veya.dmg \
  && hdiutil attach ~/Downloads/Veya.dmg -nobrowse -quiet \
  && cp -R /Volumes/Veya/Veya.app /Applications/ \
  && hdiutil detach /Volumes/Veya -quiet \
  && open /Applications/Veya.app
That edge/Veya.dmg URL always points at the current release, so the same line keeps working.
On the binary side: the app is signed with a Developer ID certificate and notarised by Apple, so Gatekeeper lets it open normally. The notarisation ticket is not yet stapled into the bundle, which means the first launch does a quick online check with Apple. If you are fully offline the very first time you open it, macOS may refuse — connect briefly, open it once, and it is fine from then on.
2. Install on Windows
Paste this into PowerShell. It downloads the installer and runs it:
irm https://dl.sozenta.ai/veya/edge/Veya-setup.exe `
  -OutFile "$env:TEMP\Veya-setup.exe"; & "$env:TEMP\Veya-setup.exe"
Windows will warn you, and that is expected. The installer is not yet Authenticode-signed, so SmartScreen shows "Windows protected your PC". Click More info → Run anyway.
We are not asking you to ignore a security warning lightly — it is a real gap on our side, and code-signing is on the list. Until then, this is the one friction point on Windows.
On the binary side: Veya installs per-user into %LOCALAPPDATA%\Veya, so it needs no administrator rights and touches nothing outside your profile. It ships its own copy of the Microsoft C++ runtime (msvcp140.dll, vcruntime140.dll and their dependencies) beside the executable, so it runs on a clean Windows install with nothing else on it — we test exactly that, on a freshly imaged VM with no runtimes installed.
Already on 0.5.1 or earlier on Windows? Those builds cannot start on a machine without the Microsoft C++ runtime, which means they also cannot reach the updater to fix themselves. Download and run the installer above — an in-app update will not rescue that version.
3. Connect a model
Veya does nothing interesting until it can reach a model. Open Settings → AI Models from the left rail.
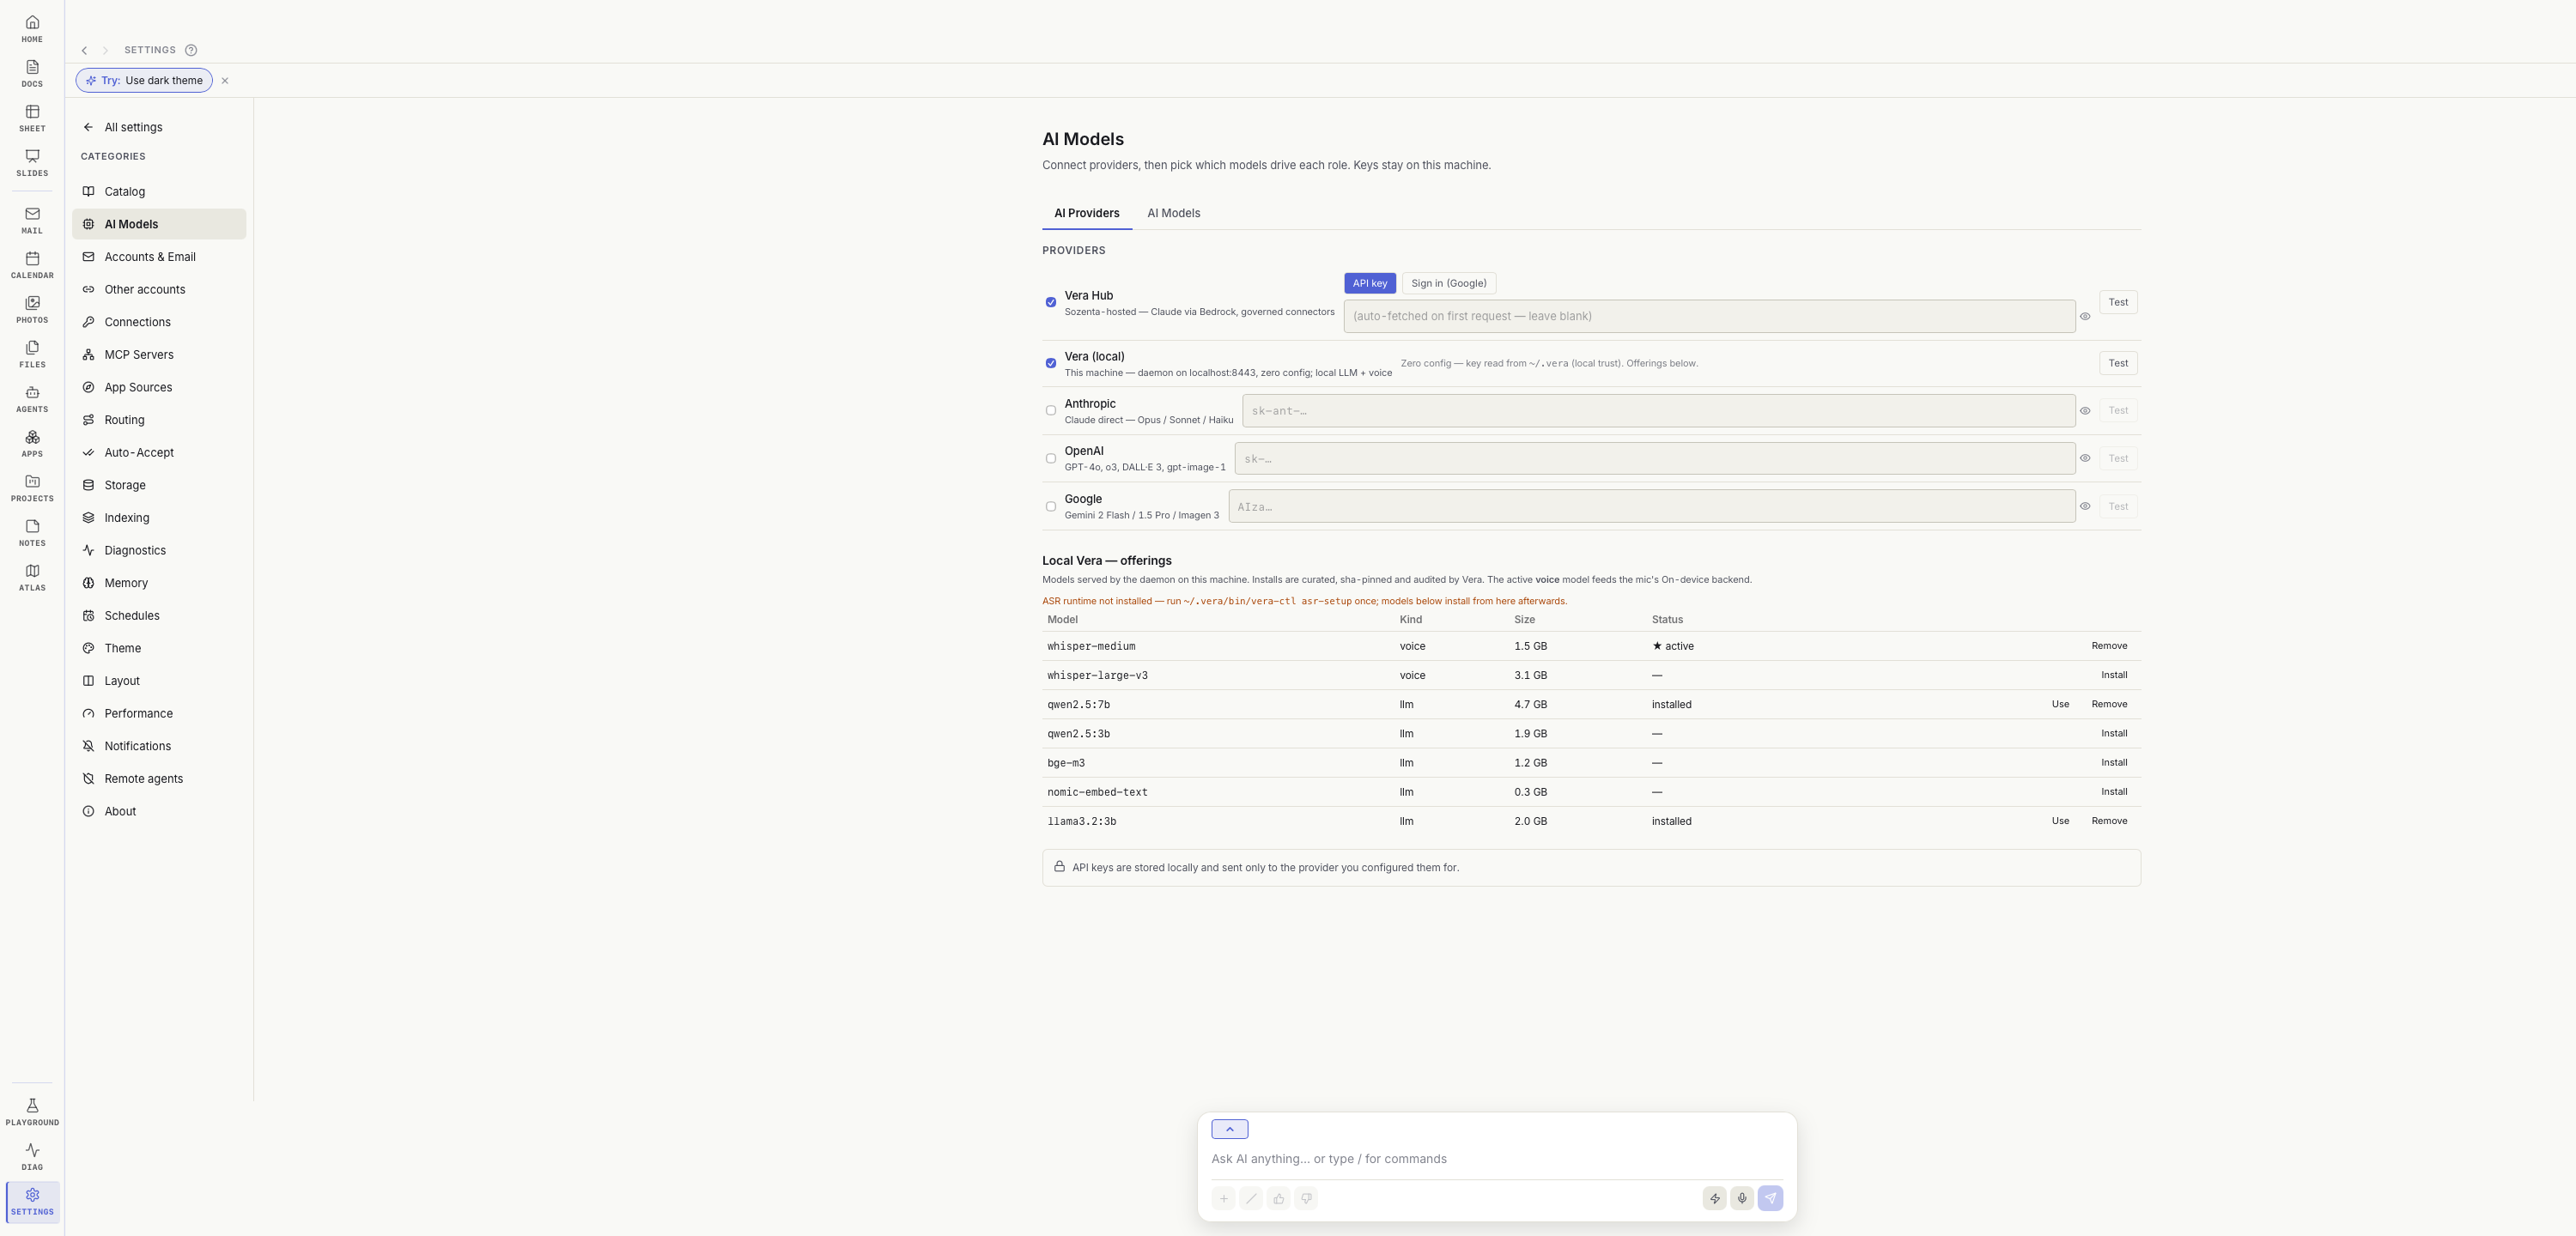
There are two ways in, and most people want the first:
- Vera Hub — our hosted service. Claude via Bedrock, with governed connectors. Tick it, then click Sign in (Google) next to it. Google opens its own sign-in; we never see your password. Your email address is the account — there is nothing else to create.
- Bring your own key — tick Anthropic, OpenAI or Google and paste an API key. Keys are stored on your machine and sent only to the provider you configured them for. Use Test to confirm the key works before you rely on it.
If you sign in to Vera Hub, you do not need any API keys. If you prefer to keep billing on your own provider account, use the second route and leave Vera Hub unticked.
Signed in and want to see what you can use? The AI Models tab — the one beside AI Providers at the top — lists every model available to you across the providers you connected, and lets you choose which model drives each role. Text, vision and image generation can each run on a different model if you want them to.
4. Connect mail and calendar
This is a different page from AI Models — look for Accounts & Email in the same left sidebar, two rows below.
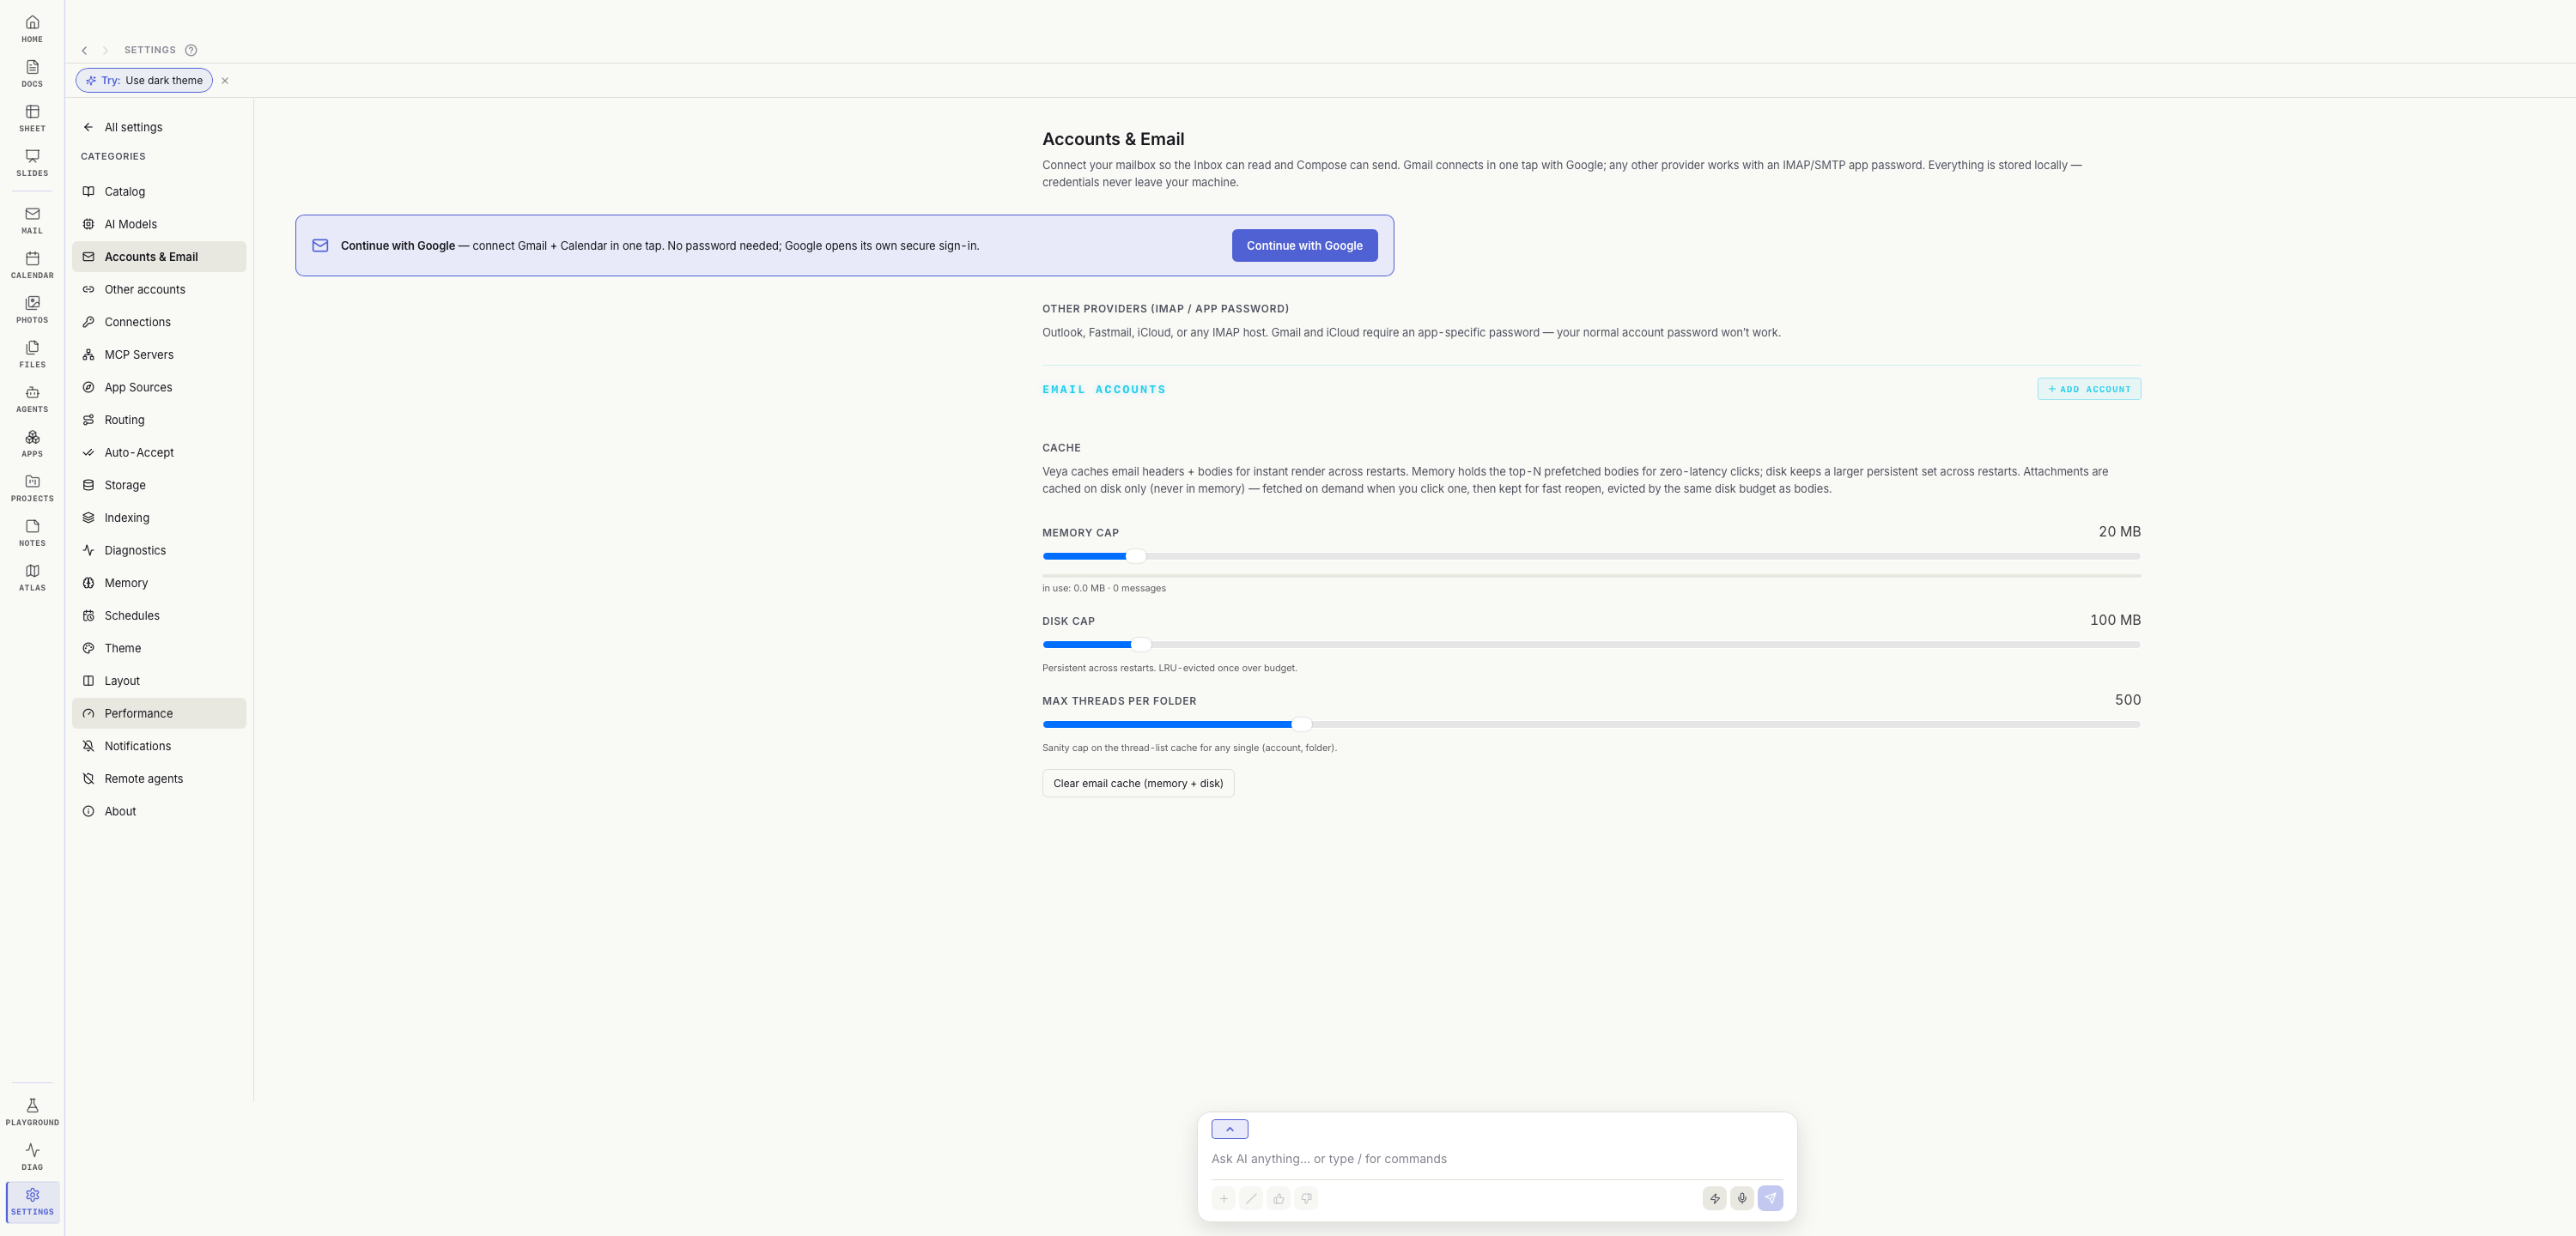
Gmail and Calendar arrive together. Click Continue with Google and both are connected in one pass — there is no separate calendar step to hunt for. Google opens its own secure sign-in; no password is typed into Veya.
For anything else — Outlook, Fastmail, iCloud, or any IMAP host — use Other providers (IMAP / app password) and + Add account.
The one thing that trips people up: Gmail and iCloud both require an app-specific password if you go the IMAP route. Your normal account password will be rejected. Generate one in your provider's security settings. This is why "Continue with Google" is the easier path for Gmail.
Everything is stored locally. Mail bodies and headers are cached on your machine so the inbox renders instantly; the cache size is yours to control on the same page, and Clear email cache empties it whenever you want.
5. Add voice
Voice is optional and runs entirely on your machine. It comes from vera-metal, a small local daemon that serves speech-to-text — and, if you want it, local language models. Nothing spoken leaves your computer.
Install the daemon and voice starts working — there is no separate step inside Veya to turn it on. macOS today; Windows within a couple of days (details below).
macOS — one line, no admin rights, no Rust toolchain:
curl -fsSL https://dl.sozenta.ai/vera/install.sh | shIt detects your OS and architecture, pulls the signed channel manifest, verifies the download's checksum, and installs a per-user daemon. Re-running it upgrades in place and keeps your data. To remove it later: ~/.vera/bin/vera-ctl uninstall (add --purge to delete the models too).
Then install the speech runtime once:
~/.vera/bin/vera-ctl asr-setupWindows: days away, not months. The installer is written and the Windows build of the daemon is in progress — we expect it within a couple of days of this post. Voice on Windows will work exactly the same way: install vera-metal with a single line, and the microphone starts working.
We are not publishing the Windows command yet because it would not work today — the build it fetches is not on the server, so it would download, find nothing, and stop. We will update this page with the command the moment it is live rather than leave you with a line that fails.
Once the daemon is running, Veya finds it automatically at localhost:8443 — there is nothing to configure. The Local Vera — offerings table on the AI Models page fills in with models you can install, and the microphone in the prompt bar starts working.
6. Install local models
Scroll to Local Vera — offerings on the AI Models page. These are curated, checksum-pinned builds served by the daemon on your machine — click Install and the download happens locally.
| Model | Kind | Size | What it is for |
|---|---|---|---|
| bge-m3 | embedding | 1.2 GB | Recommended. Semantic search and routing across your own content. Multilingual, so it works if you do not think in English. |
| whisper-large-v3 | voice | 3.1 GB | Recommended for voice. Noticeably more accurate than the medium model, especially on accents and names. |
| whisper-medium | voice | 1.5 GB | Lighter. Fine on a machine that is short on memory. |
| nomic-embed-text | embedding | 0.3 GB | Smaller, English-leaning embedding alternative. |
If you install only one thing, make it bge-m3. It is the model that makes Veya understand what your documents are about, and it is the difference between search that matches words and search that matches meaning.
A note on the local language models. The offerings list also includes local LLMs such as qwen2.5 and llama3.2. We are not recommending them yet, and we would rather say so than let you spend 5 GB finding out.
Local generation and local voice work today. But Veya cannot yet use a local model for agent work — the piece that lets a local model call tools is still being built, so agent mode currently needs Vera Hub or a provider key. Fully local routing is where we are heading; it is not here yet.
7. Let Claude Code or Claude Desktop render into Veya
This one is worth knowing about even if you skip everything else. Veya can act as an MCP server, which means Claude Code, Claude Desktop, or any other MCP client can pop native views inside your running Veya window — tables, charts, documents — rendered locally, on your machine.
Ask Claude Code to show you something, and it appears in Veya rather than as text in a terminal.
Turn it on in Settings → Memory, in the DynaView MCP panel:
- Enable the toggle. The bridge is off by default and only starts listening when you switch it on. It binds to loopback only —
127.0.0.1:9878— and never accepts a connection from outside your machine. - Copy the one-liner shown in the panel and run it. It looks like this, with your own token filled in:
claude mcp add --transport http veya-render http://127.0.0.1:9878/mcp \ --header "Authorization: Bearer <your-token>" - For Claude Desktop, the panel offers a stdio shim instead, with a config block to paste. The token is read from disk by the shim, so it is never written into your config file.
It renders. It does not read. The bridge exposes exactly three tools, all render-only: discover the catalog, render a view from a Veya data source, or display rows you hand it. No content from your workspace is ever returned to the external client — responses are status strings. The write tool is refused twice over, once in Rust and again in the frontend.
The token is stored with 0600 permissions and only its hash is held in memory; there is a host-header allowlist against DNS rebinding, and a rate limit. Loopback is not treated as safe by default.
Where things live
| What | macOS | Windows |
|---|---|---|
| Your documents | ~/Library/Application Support/app.veya.editor | %APPDATA%\app.veya.editor |
| Log file | ~/Library/Logs/app.veya.editor/veya.log | %LOCALAPPDATA%\app.veya.editor\logs\veya.log |
| The app | /Applications/Veya.app | %LOCALAPPDATA%\Veya |
Uninstalling leaves your documents alone on both platforms — that is deliberate. If you want a genuinely clean slate, delete the app-data folder above by hand after uninstalling.
Updates
Veya checks for updates on launch and every few hours. When one is available an (Update) chip appears in the top bar — click it and the app downloads, verifies its signature, installs and relaunches itself, usually in under a minute. You can also check on demand from Settings → About.
If something goes wrong — just say so
Most software asks you to reproduce the problem, describe it, find the logs, and attach them. Veya inverts that. You point at the moment; the agent assembles the evidence.
Say or type any of these, on any canvas:
report that
report a bug
report a bug: the summary grabbed the wrong email
The description after the colon is optional. "report that" on its own is a complete bug report, because the agent attaches the context automatically:
- which app and page you were on
- your last prompt run — what you asked, whether it succeeded, how long it took, what it was aimed at
- the routing decisions behind it, which is what makes a wrong action diagnosable rather than just annoying
- the last ~50 log lines, as a flight recorder
There are two other ways in, for when typing is not the natural move: the 👎 on a prompt result, and the occasional "How am I doing?" pulse after a run. All three produce the same report through the same pipeline.
You can also open Agents in the left rail and use the built-in Bug Reporter — it is always there and cannot be deleted.
On privacy: personal paths are scrubbed before anything is written to the log or sent. Reports queue in an outbox you can inspect yourself at Settings → Diagnostics → Bug report outbox — including anything the autonomous reporter filed on its own after a crash. Nothing is hidden from you.
And if you would rather look first, the log file is at the path in the table above.